Difference between revisions of "Data input tutorial"
(Tag: Visual edit) |
|||
| (19 intermediate revisions by the same user not shown) | |||
| Line 1: | Line 1: | ||
| + | These are the simple steps you need to perform to store your data (images) in Navigator-3. | ||
| + | |||
== Upload files == | == Upload files == | ||
| − | The first step is to upload the files using any FTP client (e.g. [https://filezilla-project.org/ FileZilla]) to your personal '''temporary''' folder, the URL is [[Ftp | + | The first step is to upload the files using any FTP client (e.g. [https://filezilla-project.org/ FileZilla]) to your personal '''temporary''' folder, the URL is ftp://cmbn-navigator.uio.no:50021<br />Note the non-standard port number: |
| + | |||
| + | [[File:92AD38AE-ABD7-4464-BD41-C54C8C8175FC.jpg|frameless|609x609px]] | ||
| + | |||
| + | Alternatively you can map [Ftp://cmbn-navigator.uio.no:50021 ftp://cmbn-navigator.uio.no:50021] using your operating system measures, here is the example how to do it in Windows 7: | ||
| + | |||
| + | [[File:Map ftp.PNG]] | ||
| + | |||
| + | [[File:Username ftp.PNG]] | ||
| + | |||
| + | In this case your temporary N3 folder will be available right from "Computer" folder like any other network location. | ||
== Login to Navigator-3 == | == Login to Navigator-3 == | ||
| − | After the upload is finished you can login into the main data management interface: | + | After the upload is finished you can login into the main data management interface: http://cmbn-navigator.uio.no/navigator/ You should see your project there. Please double-click on the project node and rename it/add metadata: |
[[File:Image002.png]] | [[File:Image002.png]] | ||
| Line 12: | Line 24: | ||
== Create Animal == | == Create Animal == | ||
| + | |||
Now you are ready to create the Animal. Click Add button in the Animals column. You should see this: | Now you are ready to create the Animal. Click Add button in the Animals column. You should see this: | ||
[[File:Image003.png]] | [[File:Image003.png]] | ||
| − | Please provide the | + | Please provide the metadata, the red fields are mandatory. Click Save button. '''Select the created node by clicking on it''': |
[[File:Image004.png]] | [[File:Image004.png]] | ||
| − | ==Create Block== | + | == Create Block == |
| − | The similar way you create the Block – click on Add button in the Block column, fill in the | + | The similar way you create the Block – click on Add button in the Block column, fill in the metadata, click Save button and '''select the created Block node''': |
[[File:Image005.png]] | [[File:Image005.png]] | ||
| − | ==Representations: process uploaded files== | + | == Representations: process the uploaded files == |
| − | Once the Block node is selected click Add button in the Representations | + | Once the Block node is selected click Add button in the Representations column. This button will open a panel with the files you’ve uploaded via FTP: [[File:Image006.png]] |
| − | |||
| − | [[File:Image006.png]] | ||
Select the files and drag’n’drop them to the Representation column: | Select the files and drag’n’drop them to the Representation column: | ||
| − | [[File:Image007.png]] | + | [[File:Image007.png]] [[File:Image008.png]] |
| − | |||
| − | [[File:Image008.png]] | ||
Click Yes. The processing might be a time consuming task. After it has started you can close the browser and login later to check the progress: | Click Yes. The processing might be a time consuming task. After it has started you can close the browser and login later to check the progress: | ||
| Line 42: | Line 51: | ||
[[File:Image009.png]] | [[File:Image009.png]] | ||
| − | ==Processing is finished== | + | == Processing is finished == |
After some time the processing is finished: | After some time the processing is finished: | ||
| Line 50: | Line 59: | ||
That’s it – your images are stored in N3. | That’s it – your images are stored in N3. | ||
| − | == | + | == Tools you get right out of the box == |
| + | |||
| + | These basic tools are available right after the processing is complete. | ||
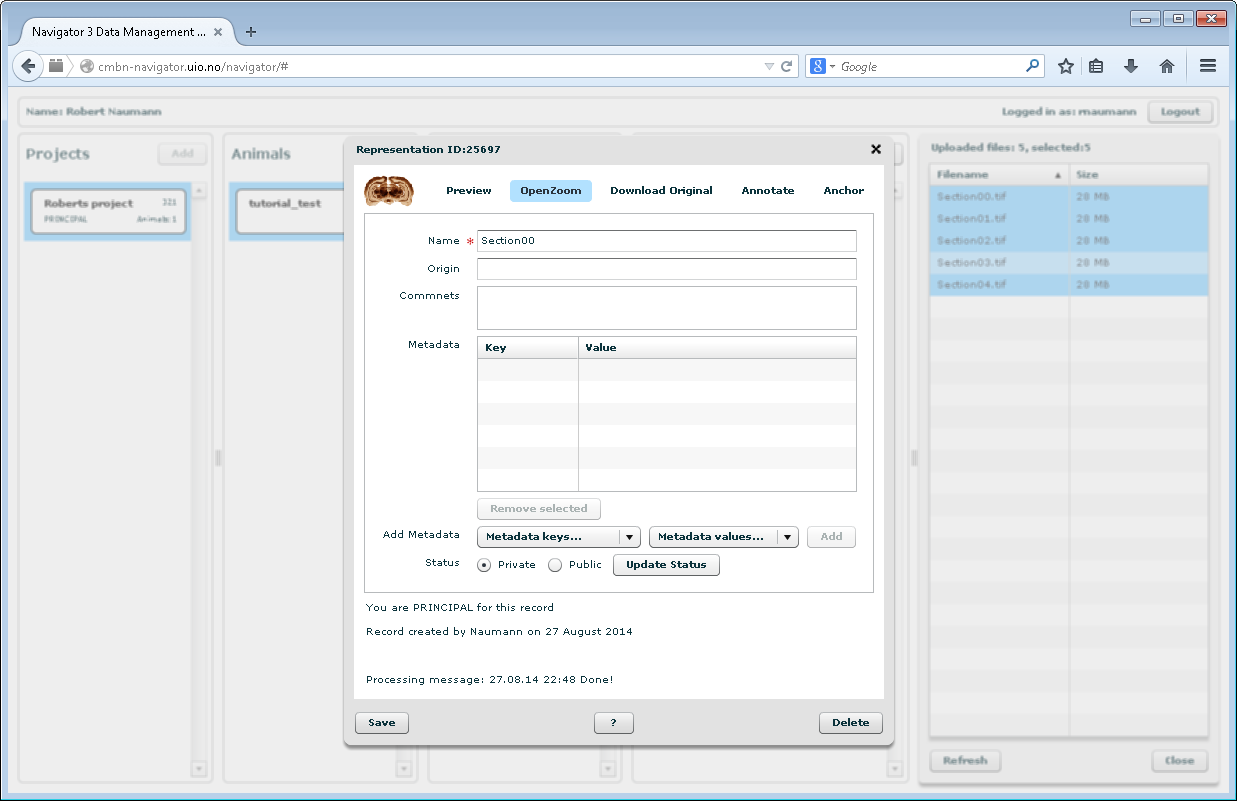
| − | #High (virtually unlimited) resolution viewer. Double click on one of the Representation nodes and click OpenZoom button:<br/>[[File:Image011.png]]<br/>It will open the viewer (use mouse (click, drag, wheel) to navigate):<br/>[[File:Image012.png]] | + | #High (virtually unlimited) resolution viewer. Double click on one of the Representation nodes and click OpenZoom button:<br />[[File:Image011.png]]<br />It will open the viewer (use mouse (click, drag, wheel) to navigate):<br />[[File:Image012.png]] |
| − | #Film strip viewer. It’s available from Block node (double-click on a block to open the window):<br/>[[File:Image013.png]]<br/>The filmstrip viewer shows all the Representations belonging to the Block (similar to files in a folder):<br/>[[File:Image014.png]] | + | #Film strip viewer. It’s available from Block node (double-click on a block to open the window):<br />[[File:Image013.png]]<br />The filmstrip viewer shows all the Representations belonging to the Block (similar to files in a folder):<br />[[File:Image014.png]] |
| − | + | == Data sharing == | |
| − | + | You can copy viewers URLs and share them (email, skype etc.) without accessing the main data management interface. The Private data is protected by username/password, the recipients should be associated (i.e. have an account) with the Project in order to access the data. | |
| − | + | [[Category:Navigator-3 help and tutorials|Navigator-3_help_and_tutorials]] | |
Latest revision as of 12:02, 20 April 2020
These are the simple steps you need to perform to store your data (images) in Navigator-3.
Contents
Upload files
The first step is to upload the files using any FTP client (e.g. FileZilla) to your personal temporary folder, the URL is ftp://cmbn-navigator.uio.no:50021
Note the non-standard port number:

Alternatively you can map ftp://cmbn-navigator.uio.no:50021 using your operating system measures, here is the example how to do it in Windows 7:


In this case your temporary N3 folder will be available right from "Computer" folder like any other network location.
After the upload is finished you can login into the main data management interface: http://cmbn-navigator.uio.no/navigator/ You should see your project there. Please double-click on the project node and rename it/add metadata:

Click Save button.
Create Animal
Now you are ready to create the Animal. Click Add button in the Animals column. You should see this:

Please provide the metadata, the red fields are mandatory. Click Save button. Select the created node by clicking on it:

Create Block
The similar way you create the Block – click on Add button in the Block column, fill in the metadata, click Save button and select the created Block node:

Representations: process the uploaded files
Once the Block node is selected click Add button in the Representations column. This button will open a panel with the files you’ve uploaded via FTP: 
Select the files and drag’n’drop them to the Representation column:


Click Yes. The processing might be a time consuming task. After it has started you can close the browser and login later to check the progress:

Processing is finished
After some time the processing is finished:

That’s it – your images are stored in N3.
Tools you get right out of the box
These basic tools are available right after the processing is complete.
- High (virtually unlimited) resolution viewer. Double click on one of the Representation nodes and click OpenZoom button:
It will open the viewer (use mouse (click, drag, wheel) to navigate):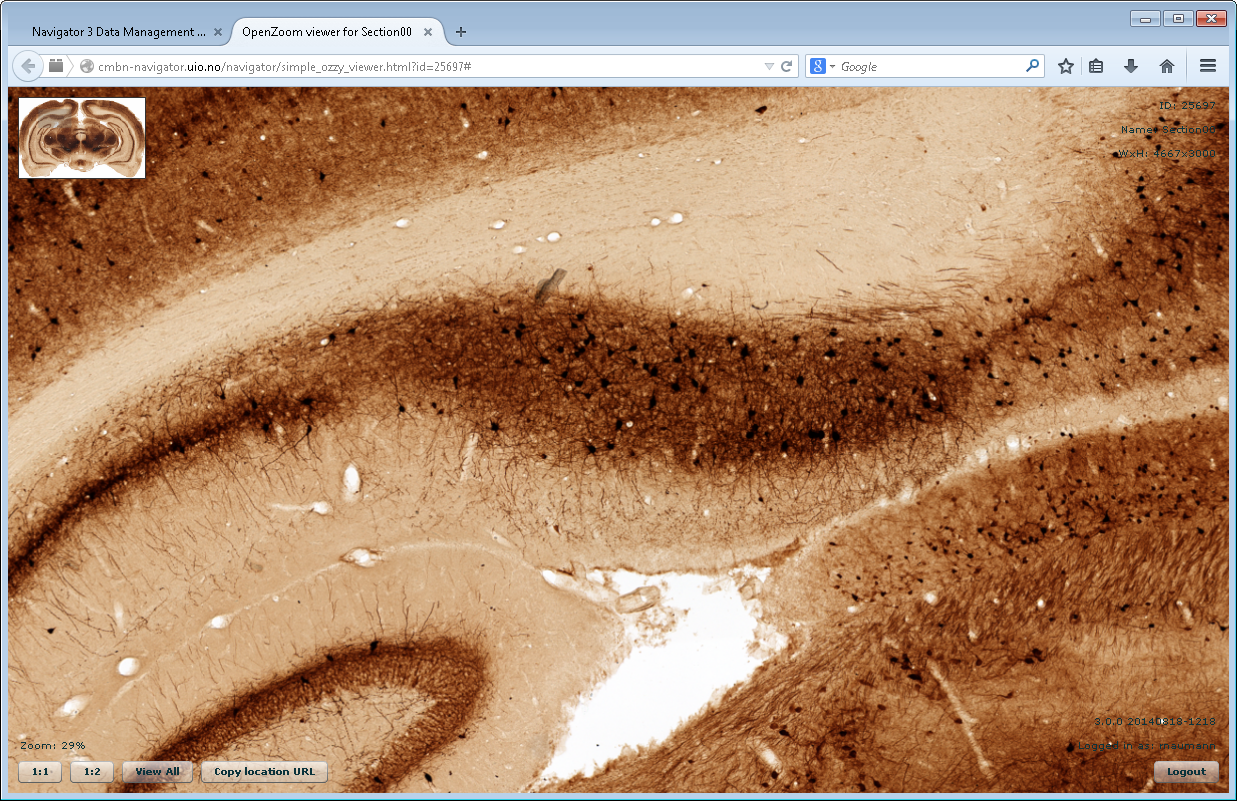
- Film strip viewer. It’s available from Block node (double-click on a block to open the window):
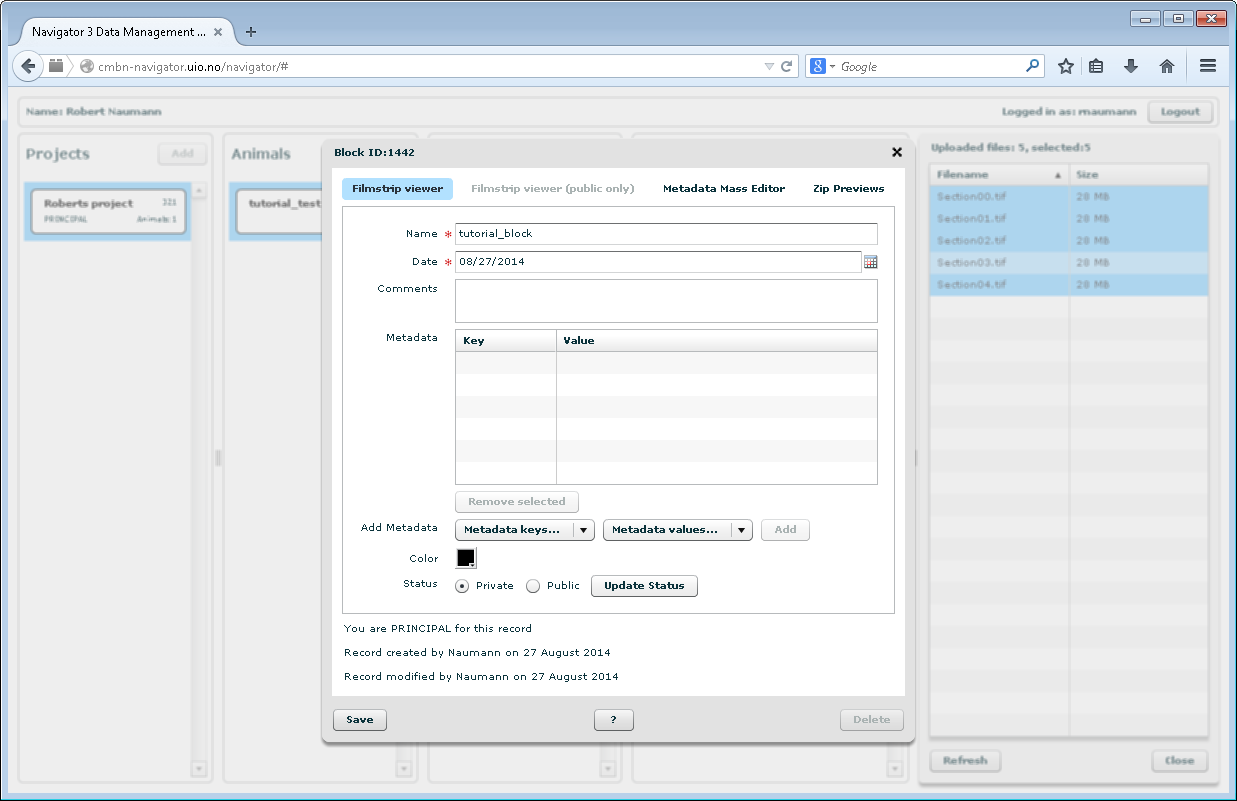
The filmstrip viewer shows all the Representations belonging to the Block (similar to files in a folder):


Data sharing
You can copy viewers URLs and share them (email, skype etc.) without accessing the main data management interface. The Private data is protected by username/password, the recipients should be associated (i.e. have an account) with the Project in order to access the data.