Difference between revisions of "Ultimaker"
(reformaterte siden) |
|||
| Line 2: | Line 2: | ||
== Getting started with 3D printing on the Ultimakers == | == Getting started with 3D printing on the Ultimakers == | ||
| − | 3D printing with the Ultimaker is fast, cheap, and a fun experience based on [https://en.wikipedia.org/wiki/Fused_filament_fabrication FDM] technology. However, it is easy to make mistakes due to hardware or software setup. The following article is supposed to give you as a user, the necessary background for getting started with rapid prototyping and 3D | + | 3D printing with the Ultimaker is fast, cheap, and a fun experience based on [https://en.wikipedia.org/wiki/Fused_filament_fabrication FDM] technology. <br> |
| + | However, it is easy to make mistakes due to hardware or software setup. The following article is supposed to give you as a user, the necessary background for getting started with rapid prototyping and 3D printing with the Ultimakers. | ||
| + | We currently have 4 ultimakers at Sonen. We recommend these printers for the first time you 3D print. | ||
== Required Safety Equipment == | == Required Safety Equipment == | ||
| Line 14: | Line 16: | ||
</gallery> | </gallery> | ||
| − | + | == Guidelines == | |
* Do not use the printer unless you know how to use it. | * Do not use the printer unless you know how to use it. | ||
* Print only in Polymaker or Ultimaker 2.85 PLA Filament. | * Print only in Polymaker or Ultimaker 2.85 PLA Filament. | ||
* Use only 0.4 mm nozzle size. | * Use only 0.4 mm nozzle size. | ||
| + | * Do not tamper with the 3D printer. | ||
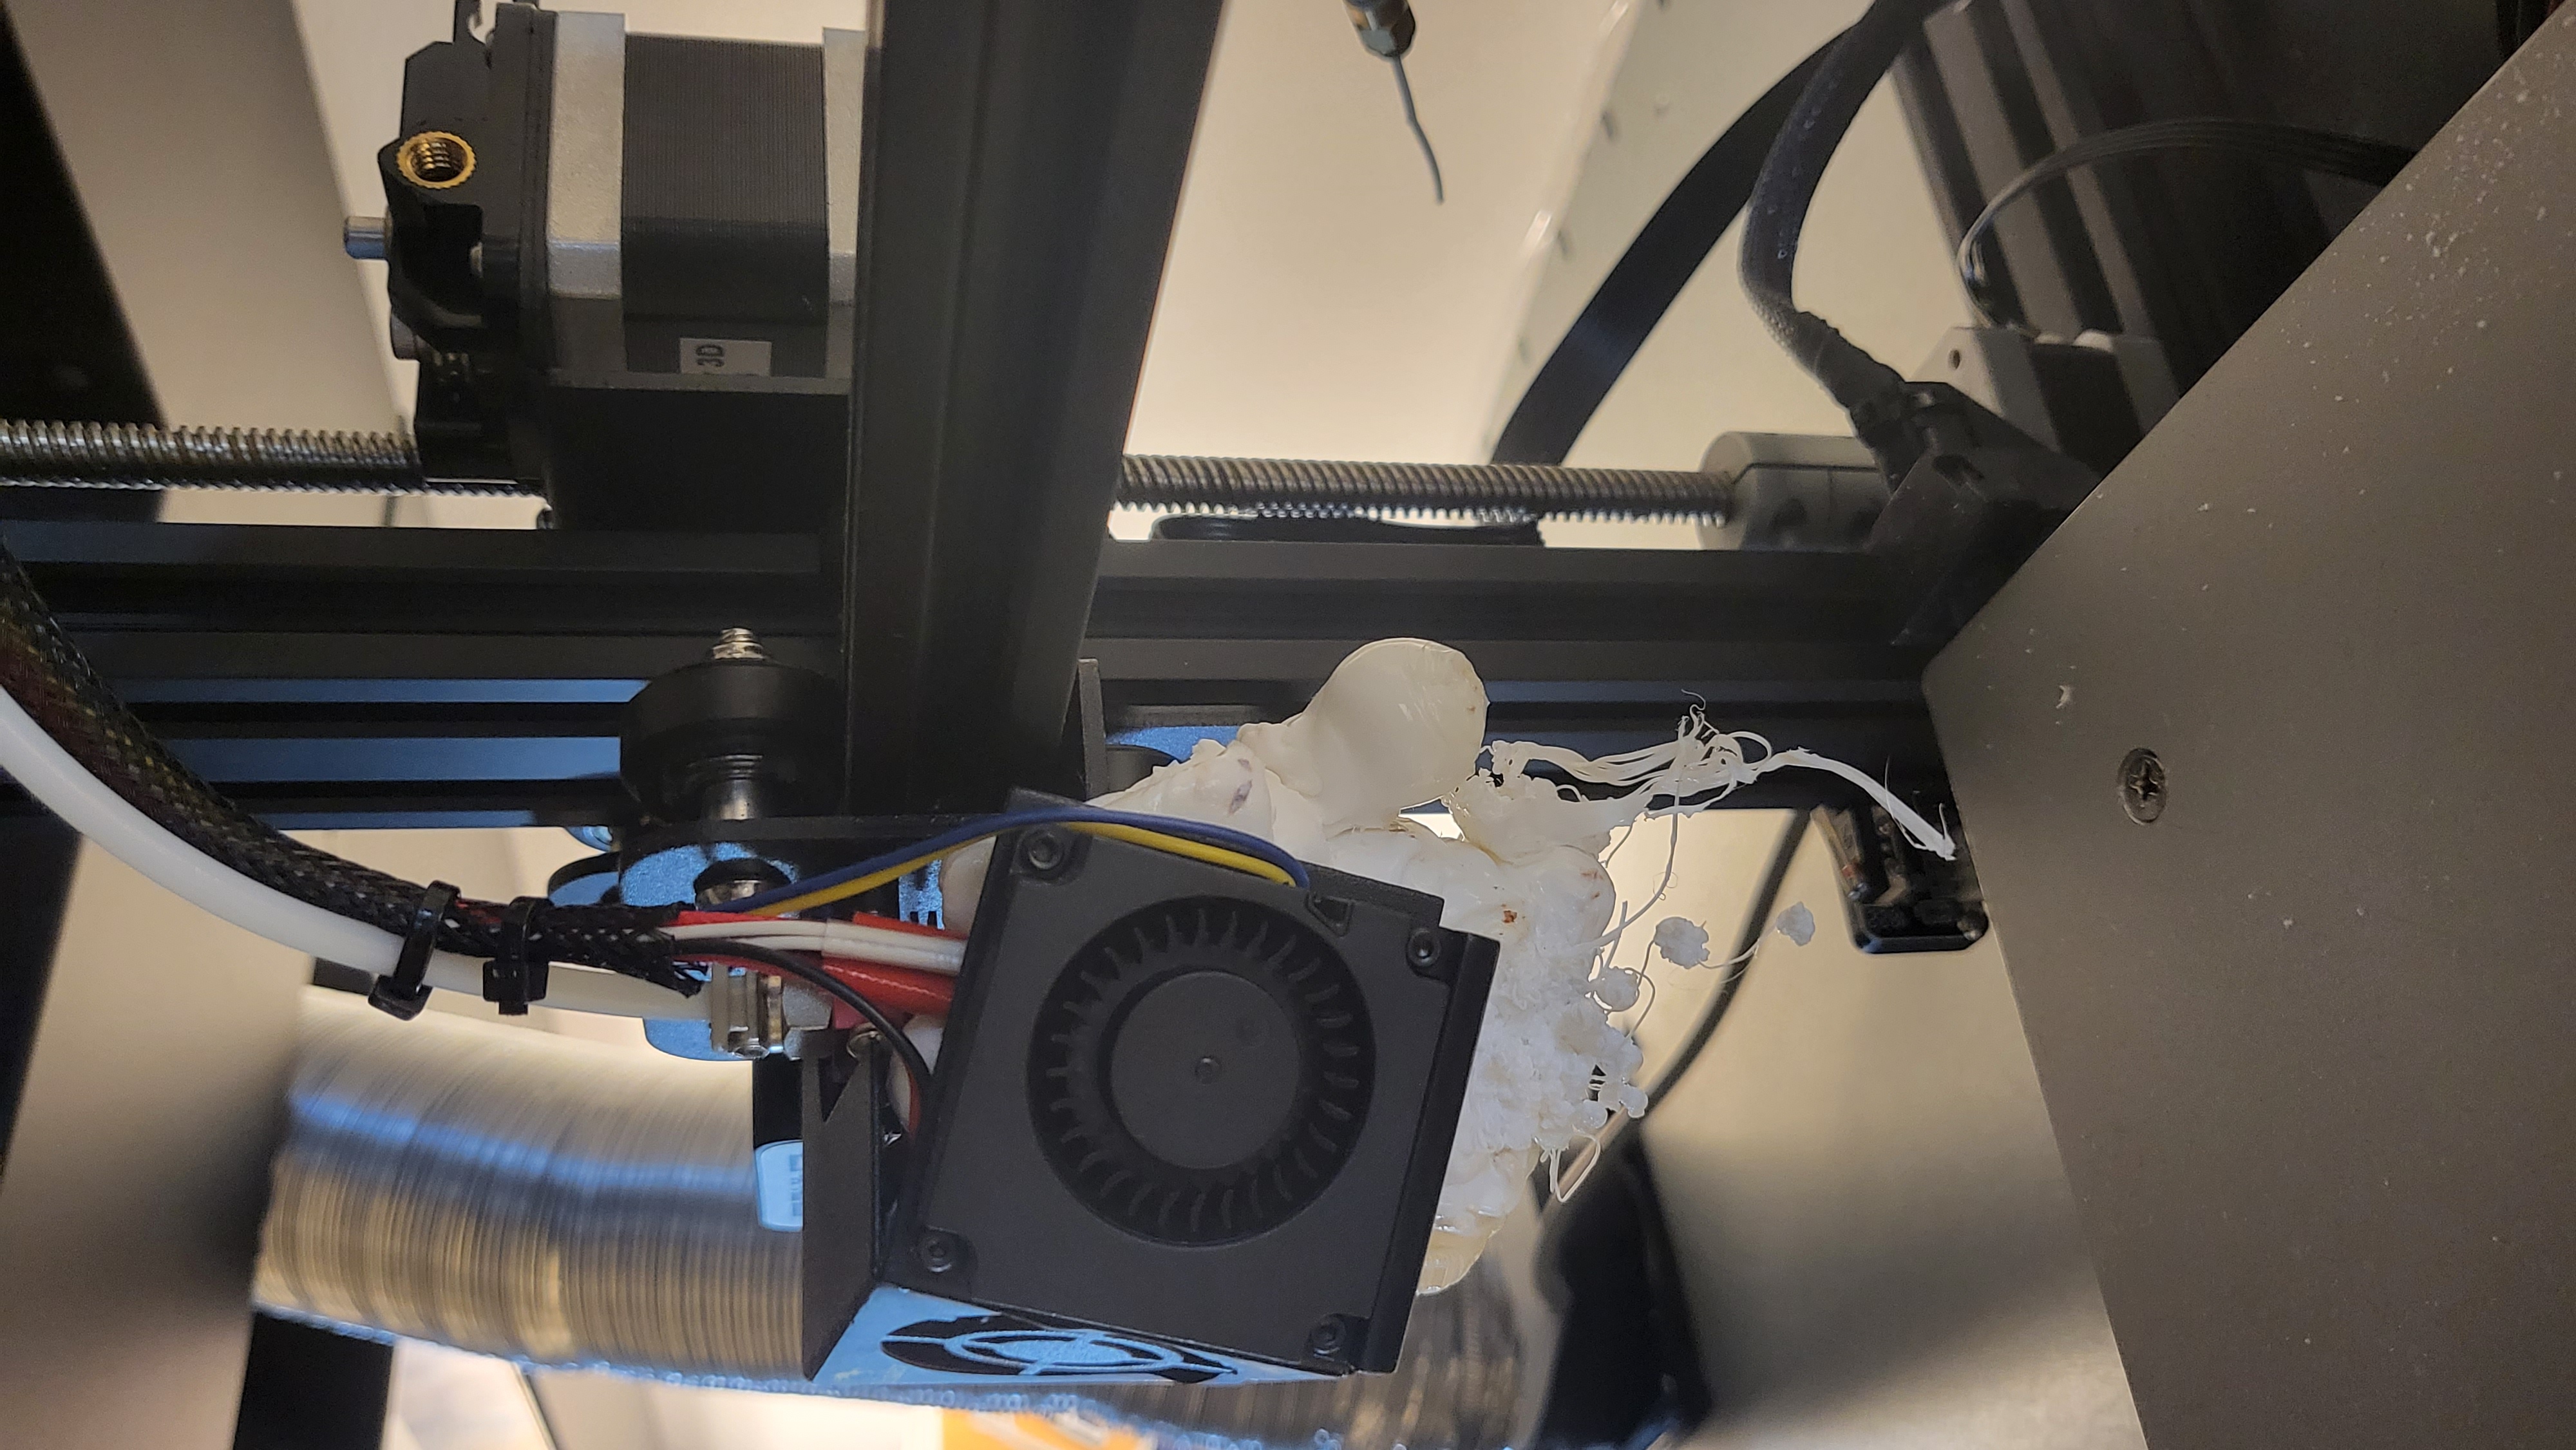
* Do not leave the printer before the first layer is completed. Most errors arise during this stage and in 2020 this destroyed a [[Media:Print_fail.jpg | printer]]. | * Do not leave the printer before the first layer is completed. Most errors arise during this stage and in 2020 this destroyed a [[Media:Print_fail.jpg | printer]]. | ||
* If you want instruction, have trouble with the printer or we are running low on materials, contact the engineer [mailto:ifi-sonen@ifi.uio.no here]. | * If you want instruction, have trouble with the printer or we are running low on materials, contact the engineer [mailto:ifi-sonen@ifi.uio.no here]. | ||
| + | * Always follow the SOP outlined bellow. | ||
| − | == | + | == Standard Operating Procedure == |
The workflow in any prototyping using 3D printers is: | The workflow in any prototyping using 3D printers is: | ||
| − | |||
| − | |||
| − | |||
| − | == [https:// | + | === 1. Retrieve/create a 3D model === |
| − | + | You can fetch files from creator spaces such as [https://www.thingiverse.com/ Thingiverse] or model them your self, using a CAD tool such as [https://www.autodesk.com/products/fusion-360/students-teachers-educators Fusion360], [https://robin.wiki.ifi.uio.no/Solidworks SolidWorks] or [https://www.blender.org/download/ Blender]. <br> | |
| + | The next step requires the file format of your model to be either .3mf or .stl. | ||
| − | === | + | === 2. Generate toolpaths for the 3D printer === |
| − | + | The tool for generating toolpaths for 3D printers is called a [https://en.wikipedia.org/wiki/3D_printing slicer]. For Ultimaker printers we use [https://ultimaker.com/software/ultimaker-cura Cura]. A quick guide to Cura can be found [https://support.ultimaker.com/hc/en-us/articles/360012007119-How-to-start-your-first-print-in-Ultimaker-Cura here]. <br> | |
| + | The standard preset grants high detailed results and short printing time. You can tweak the print settings as you see fit. as long as it's in accordance with our [[3D printing | 3D printing guidelines]]. I.e. Total printing time should not exceed 1 day (24 hours). Infill should not exceed 20%. <br> | ||
| + | This process is called slicing. This gives you a .gcode file. Save this file onto a SD card and insert it into the printer. | ||
| − | + | === 3. Prepare the build plate === | |
| − | + | Remove any debris that may be on the plate. If the bed is starting to get dirty, rinse it with lukewarm water. The water will dissolve the leftover glue on the build plate. <br> | |
| − | + | Though not necessary, for larger prints or prints with challenging geometry, using glue may help with adhesion to the buildplate. Apply glue on the area of the build plate where your first layer will adhere. On the ultimakers we use Magigoo. | |
| − | |||
| − | |||
| − | === | + | === 4. Double check the filament === |
| − | + | Make sure that the type of filament on the spool holder corresponds to the material defined in your slicer and on the 3d printer itself. Both should be PLA. A mismatch may cause your print to fail. <br> | |
| + | Make sure that there is enough material remaining. In your slicer you will get an estimate of how many grams of filament is required for the print. On the side of the filament spool there is an indicator estimating amount of remaining filament. Should you run out of material during printer, the print will fail. | ||
| − | == | + | === 5. Inspect the first layer === |
| − | + | Almost all failures and print defects may be detected when printing the first layers. | |
| − | + | No filament coming out of nozzle: The nozzle is clogged, the filament is stripped, the spool is jammed or there is no filament left on the spool. | |
| + | Less filament than expected is being extruded: Partial clog in the nozzle, the filament extruder tension is too loose or the spool is jammed. | ||
| + | Print not sticking to bed or the layer looks transparent or to thin: The bed is out of level. | ||
| + | The print is in a different location than what i assigned in the slicer: Wrong printer selected in the slicer. | ||
| + | |||
| + | === 6. Remove yor print from the printer === | ||
| + | To remove your part from the build plate, using a scraper tool may help. However, make sure you don't harm the glass plate. Hence use scraping tools with care. | ||
| + | If you are having trouble removing the print from the bed, removing the bed from the printer may help. Simply remove the front latches on the printer to remove the glass bed. | ||
| − | = | + | === 7. Post processing your part === |
| − | + | Arguably the most boring part of 3d printing. Break of supports, peal off brims. Tidy up the print with a knife and/or sandpaper. 3D printed parts are well suited for painting. | |
| − | |||
| − | |||
| − | === | + | === 8. Tidy up after you === |
| − | + | Dispose of supports and other leftover parts of your print in the designated bin. Replace all tools to their proper home. [https://support.ultimaker.com/hc/en-us/articles/360011905519-Cleaning-the-Ultimaker-2- Clean] the buildplate with lukewarm water if necessary and replace it in the printer. | |
| − | == | + | == Filament == |
| − | We | + | We only use filament from Polymaker and Ultimaker which is due to quality. The material used on the Ultimakers are strictly [https://en.wikipedia.org/wiki/Polylactic_acid PLA]. <br> |
| + | This is to reduce maintenance and downtime on the 3d printers. For printing other materials see our [[Creality | Creality CR-10S Pro V2]] printers or our [[Bambu | Bambu X1 Carbon]]. <br> | ||
| + | Ultimaker printers only support 2.85 mm filament. <br> | ||
== Errors == | == Errors == | ||
Latest revision as of 15:39, 27 November 2023

Contents
Getting started with 3D printing on the Ultimakers
3D printing with the Ultimaker is fast, cheap, and a fun experience based on FDM technology.
However, it is easy to make mistakes due to hardware or software setup. The following article is supposed to give you as a user, the necessary background for getting started with rapid prototyping and 3D printing with the Ultimakers.
We currently have 4 ultimakers at Sonen. We recommend these printers for the first time you 3D print.
Required Safety Equipment
None
Hazards

The bed and nozzle are hot during, and after printing.

Moving parts during operation.

Build plate may cause minor pinching or crushing injuries during operation.


Guidelines
- Do not use the printer unless you know how to use it.
- Print only in Polymaker or Ultimaker 2.85 PLA Filament.
- Use only 0.4 mm nozzle size.
- Do not tamper with the 3D printer.
- Do not leave the printer before the first layer is completed. Most errors arise during this stage and in 2020 this destroyed a printer.
- If you want instruction, have trouble with the printer or we are running low on materials, contact the engineer here.
- Always follow the SOP outlined bellow.
Standard Operating Procedure
The workflow in any prototyping using 3D printers is:
1. Retrieve/create a 3D model
You can fetch files from creator spaces such as Thingiverse or model them your self, using a CAD tool such as Fusion360, SolidWorks or Blender.
The next step requires the file format of your model to be either .3mf or .stl.
2. Generate toolpaths for the 3D printer
The tool for generating toolpaths for 3D printers is called a slicer. For Ultimaker printers we use Cura. A quick guide to Cura can be found here.
The standard preset grants high detailed results and short printing time. You can tweak the print settings as you see fit. as long as it's in accordance with our 3D printing guidelines. I.e. Total printing time should not exceed 1 day (24 hours). Infill should not exceed 20%.
This process is called slicing. This gives you a .gcode file. Save this file onto a SD card and insert it into the printer.
3. Prepare the build plate
Remove any debris that may be on the plate. If the bed is starting to get dirty, rinse it with lukewarm water. The water will dissolve the leftover glue on the build plate.
Though not necessary, for larger prints or prints with challenging geometry, using glue may help with adhesion to the buildplate. Apply glue on the area of the build plate where your first layer will adhere. On the ultimakers we use Magigoo.
4. Double check the filament
Make sure that the type of filament on the spool holder corresponds to the material defined in your slicer and on the 3d printer itself. Both should be PLA. A mismatch may cause your print to fail.
Make sure that there is enough material remaining. In your slicer you will get an estimate of how many grams of filament is required for the print. On the side of the filament spool there is an indicator estimating amount of remaining filament. Should you run out of material during printer, the print will fail.
5. Inspect the first layer
Almost all failures and print defects may be detected when printing the first layers. No filament coming out of nozzle: The nozzle is clogged, the filament is stripped, the spool is jammed or there is no filament left on the spool. Less filament than expected is being extruded: Partial clog in the nozzle, the filament extruder tension is too loose or the spool is jammed. Print not sticking to bed or the layer looks transparent or to thin: The bed is out of level. The print is in a different location than what i assigned in the slicer: Wrong printer selected in the slicer.
6. Remove yor print from the printer
To remove your part from the build plate, using a scraper tool may help. However, make sure you don't harm the glass plate. Hence use scraping tools with care. If you are having trouble removing the print from the bed, removing the bed from the printer may help. Simply remove the front latches on the printer to remove the glass bed.
7. Post processing your part
Arguably the most boring part of 3d printing. Break of supports, peal off brims. Tidy up the print with a knife and/or sandpaper. 3D printed parts are well suited for painting.
8. Tidy up after you
Dispose of supports and other leftover parts of your print in the designated bin. Replace all tools to their proper home. Clean the buildplate with lukewarm water if necessary and replace it in the printer.
Filament
We only use filament from Polymaker and Ultimaker which is due to quality. The material used on the Ultimakers are strictly PLA.
This is to reduce maintenance and downtime on the 3d printers. For printing other materials see our Creality CR-10S Pro V2 printers or our Bambu X1 Carbon.
Ultimaker printers only support 2.85 mm filament.
Errors
If a print goes wrong, do the accordingly:
- Check setup in Cura and on UM.
- Rewash the bed level.
- Calibrate bed level. Here you can find guidelines for manual leveling.
If this does not help, please notify the engineer here.
Clog
Clogging of the nozzle typically occurs when the workpiece has tilted due to overhang, wrong settings in Cura, or wrong filament type. A solution to clogged nozzle is using the Atomic Method